Get Monit to repair your server!

Monit is an open source utility for managing and monitoring, processes, files, directories and filesystems on a UNIX system. Monit is capable of automatic maintenance and repair and can execute meaningful causal actions in error situations. It takes less than 15 minutes to setup and run this wonderful tool on most Unix servers. It also comes with a buit in web based service manager.

I personally prefer Monit over Nagios or ZABBIX. They are pain to install and not as flexible as Monit. AFAIK, Nagios only notifies and records events. It is unable to take a casual maintainance action such as restarting the service.

You will find some useful Monit scripts here.

My Kudos to the Monit team. I’m one happy Monit user 🙂

Ubuntu 8.10 on Lenovo 3000 N200

Few hours ago I upgraded my Ubuntu 8.04 to 8.10. Upgrade it self was a smooth one. Download took around 1.5 hours and the installation was around 45 minutes. Ubuntu 8.10 Human theme looks sexy. New wireless driver for Intel 3945ABG has support for the LED indicator as well.

Only issues were:

  1. ALSA was locked while it’s being used by any application.
  2. OpenVPN Client was not routing all traffic through the tunnel (There was no obvious option to do add the routes in the NetworkManager)

ALSA issue was fixed with almost no effort but the solution for the OpenVPN client issue was not so obvious (at least for me).

Adding the following line to /etc/modprobe.d/alsa-base fixed the ALSA locking issue.

options snd-hda-intel model=lenovo

In NetworkManager 0.7 all traffic will not be routed through the tunnel if the OpenVPN serve pushes any routes or all of the rules that are pushed through are ignored. You can make NetworkManager to route all traffic through the tunnel by pushing a route similar to 0.0.0.0 0.0.0.0 gw 172.16.1.5 by adding a line similar to bellow to /etc/openvpn/openvpn.conf in the OpenVPN server

push "route 0.0.0.0 0.0.0.0 gw 172.16.1.5"

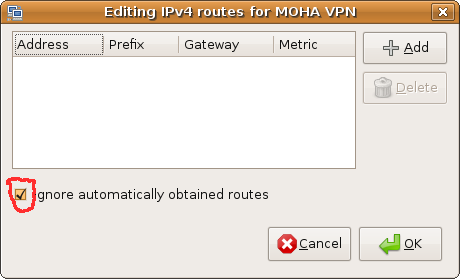
or by making NetworkManager to ignore all routes pushed from the server. Check the “Ignore automatically obtained routes” checkbox in the Routes dialog in the VPN editing dialog (IPv4 Setting).
That’s it and my notebook is working better than it was before the upgrade. 🙂

References: http://bugzilla.gnome.org/show_bug.cgi?id=552594 | https://bugs.launchpad.net/ubuntu/+source/linux-source-2.6.22/+bug/136810

One more day for Ubuntu 8.10 release

Ubuntu 8.10 named Intrepid Ibex will be released on 30th October 2008. I’m looking forward for the release tomorrow. I’ll be upgrading my machines to Ibex. New features in 8.10 are:


Ubuntu 8.10 is here

  • GNOME 2.24
  • X.Org 7.4
  • Linux kernel 2.6.27
  • Encrypted private directory
  • Guest session
  • Network Manager 0.7
  • Samba 3.2
  • PAM authentication framework
  • Totem BBC plugin
  • Server Virtualization

There is more, you can check out http://www.ubuntu.com/testing/810rc.

Check your page rank now!

PageRank is Google’s measure of the importance of a web page. It is a numeric score assigned by Google and ranges from 0 to 10. Google uses the vast link structure of the web as an indicator of an individual page’s value. When one page links to another, it is effectively casting a vote for the other page. Google also analyzes the page that casts the vote. Votes received from pages that are themselves “important” carry more weight. Google combines PageRank with text-matching techniques to find web pages that are both important and relevant to search queries.

You can now check your Google PageRank without using the Google toolbar, check out http://www.mohanjith.net/pagerank/ .

Using memcached with WordPress object cache

I like the web pages to be snappy, including my blog. I found my blog to be bit slow after I moved to WordPress even after performance tuning. After looking around for a solution I came across memcache back-end for WordPress object cache which can be downloaded from here. You have to drop the file object-cache.php into wp-content/. You will have to specify the memcached servers by adding the following lines to wp-config.php.
[sourcecode language=’php’]global $memcached_servers;
$memcached_servers = array(‘default’ => array(‘127.0.0.1:11211’));[/sourcecode]
My blog loaded faster than before, it was all good. Afterwards I wanted to install the memcache back-end for WP object cache on my mother’s blog using the same memcached server. I just dropped the wp-config.php file into my mother’s installation of WordPress. That’s when things became awry. My mother’s blog started to redirect to my blog 🙁 . After looking at wp-config.php closely it was clear to me it was designed for WordPress MU. However I didn’t want to give up on using memcache with WordPress. Looking even closer I noticed that I can specify the global variable $blog_id and it would be perpended to the memcache object key. I added the following line to wp-config.php in my mother’s WordPress installation in addition to the two lines above and applied this patch (patched object-cache.php).
[sourcecode language=’php’]global $blog_id;
$blog_id = ‘priyani_mohanjith_net’;[/sourcecode]
That’s it, both my blog and my mother’s blog became fast and it was working without any issues. Hope this helps someone who wants to use the same memcached server with multiple installtions of vanilla WordPress. You cannot use this technique or memcache unless your blog is self hosted on a server where you have full control.

Bye, bye Blogger. Howdy WordPress

Finally moved my blog to WordPress from Blogger. I also moved it to a different URL as well. Move was as smooth as it could get. I wasn’t sure whether I should make the move. I didn’t want any Google juice to be lost or give my readers 404s. In my old setup I was using Feedburner to serve my feeds and Blogger to serve my blog. Now WordPress serves the blog and Feedburner still serves the feeds. Here you have the steps.

  1. Install WordPress (I used 2.6.3)
  2. Import the blog posts and comments from Blogger. Go to Manage -> Import in WordPress and follow the instructions there.
  3. Set the authors properly.
  4. Download and install the WordPress plugin wp-maintain-blogger-permalinks-1.0.zip. (Do not forget to enable the plugin as well)
  5. Under Manage > Maintain Blogger Permalinks click the button that says Maintain Blogger Permalinks.
  6. You can disable (or even delete) the wp-maintain-blogger-permalinks plugin.
  7. Go to Options > Permalinks, select Custom, and enter the following:
    /%year%/%monthnum%/%postname%.html

…and you are done 🙂 .
Hope this helps someone who wants to move to WordPress form blogger.

Google Maps and Sri Lanka Postal Codes

I revisited one of my projects from the school days, Sri Lanka Postal Codes Search. I haven’t touched it from ages, but looking at Google Analytics it was the most popular part of my site apart from the blog. On few occasions some of the users had suggested some usability improvements such as Post Office name auto completion, Google Maps to show the Post Office location, and also to allow users to report errors or omissions within the site itself. They were valid requests but with my busy schedule never got about to implement them. Finally last weekend I got some free time to make these improvements.

Now the Sri Lanka Postal Codes section has two parts, the search and regional details section. In the search the Post Office Name and the Postal Code fields will be auto completed. During auto completion, other filters are also evaluated. In the regional details section, Post Office location is provided on Google Maps. The Post Offices are categorized into their respective provinces and districts.

During the course of the week I plan to implement a feed back form designed specifically for the purpose allowing the users to report errors and omissions.

Hope you like the new and improved Sri Lanka Postal Codes Search and Sri Lanka Postal Codes List.

PS: Location co-ordinates are provided courtesy of GeoNames Project

Persistent storage for Amazon EC2 with EBS

Last week (20th August) Amazon Web Services released Amazon Elastic Block Store (EBS). Amazon EBS provides block level storage volumes for use with Amazon EC2 instances. Amazon EBS volumes are off-instance storage that persists independently from the life of an instance. Amazon Elastic Block Store provides highly available, highly reliable storage volumes that can be attached to a running Amazon EC2 instance and exposed as a device within the instance. Amazon EBS is particularly suited for applications that require a database, file system, or access to raw block level storage.

This is a follow up to my posting, http://blog.mohanjith.net/2008/02/amazon-ec2-with-rock-solid-persistent.html. The method described there is obsolete with the release of Amazon EBS. None the less you can place the jail file system inside the EBS block device and not worry about having to build AMIs from time to time.

Hope this information helps someone.

BlueProximity

BlueProximity is a cool GNOME application that detects the proximity to a Bluetooth device to determine whether the user is in proximity. If the user is way the screen will be locked (or any command be run), when the user is in proximity the screen will be unlocked (or any command be run).

However if the screen is manually locked it will not be unlocked because the Bluetooth device is in proximity. Should the screen be locked because the Bluetooth device is away, you can manually unlock the screen.

Blueproximity allows you to secure your machine while not going through the inconvenience of locking the screen when you are leaving the machine and then unlocking it when you are back. BlueProximity, Leave it – it’s locked, come back – it’s back too…